SSO for Azure Active Directory
The purpose of this document is to describe how to set up SSO using Azure Active Directory. This document assumes that you will configure the necessary permissions and settings in order to enable SSO functionality with Creatable, as your organization may have specific policies to govern those settings and processes.
In order to complete the setup with Azure, the following pieces of information must be exchanged:
- From Azure: An Application (client) ID from the App registration
- From Azure: The domain to authorize against. This should be the domain of the user’s email address who will be using Creatable
- From Creatable: The reply URL of the Creatable dashboard
Let’s start by gathering the necessary information from Azure.
Once you have created an App Registration and an Enterprise application in the Azure panel, you will have enabled everything needed to make the SSO connection function. Please ensure that users have the correct permissions, and access, to the new App Registration and Enterprise application according to your organization’s policies.
From the “App registration” screen, click on the application that was created for Creatable:
.png?width=688&height=380&name=blobid0%20(1).png)
On the app details screen, you will see the “Application (client) ID”:
.png?width=688&height=371&name=blobid1%20(1).png)
Copy the Application (client) ID and provide this, along with the list of user email addresses that will need to access Creatable to your client success account manager.
For the purposes of this document, “yourstoredemo.com” was configured within the Azure Active Directory. This will allow a user with an email address that contains the “@yourstoredemo.com” email address to authenticate and be granted access to Creatable.
.png?width=688&height=498&name=blobid2%20(1).png)
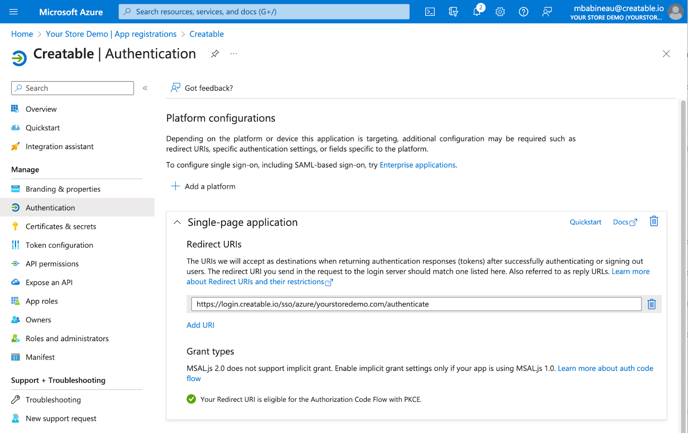
Next, in the App Registration, you can click on the “Authentication” section to configure the Redirect URI for Creatable.
This follows the pattern of:
https://login.creatable.io/sso/azure/{{email_domain_from_above}}/authenticate
In the Your Store Demo example, this would be:
https://login.creatable.io/sso/azure/yourstoredemo.com/authenticate

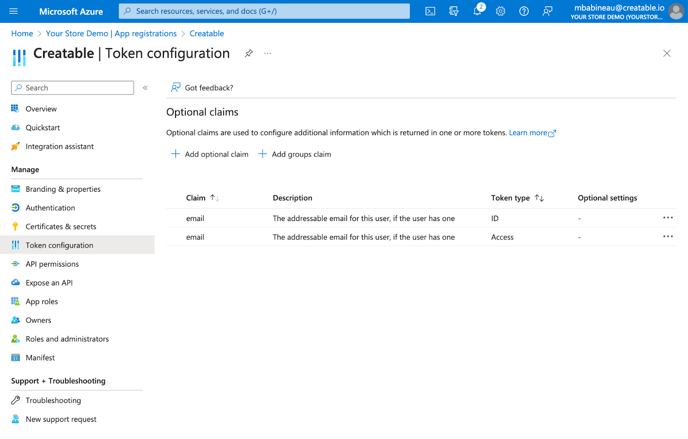
Next, under “Token configuration” you want to make sure that you have added the “Optional claim” for “email”, so the information will be passed to Creatable via the JWT token.
 Next, under the "Implicit gran and hybrid flows" section, make sure that "Access tokens" and "ID tokens" are checked:
Note: A user must have an email address in order to access Creatable.

Once you have configured the App registration, the Enterprise application and given the appropriate users the correct permissions / access according to your organization’s policies, you can provide your client success account manager with the required information in order to complete the setup process.
After the setup has been completed, you are now able to access Creatable via SSO with Azure Active Directory. If you are having trouble accessing Creatable, please contact your client success account manager (support@creatable.io) for assistance and we will help troubleshoot any issues.