Install a conversion pixel to track and monitor creator sales
NOTE: If you are using BigCommerce or Shopify as your ecommerce platform, please see instructions at the bottom of this article.
Requirements
The conversion pixel is installed on the final checkout page after the transaction is complete. The Creatable conversion tracking pixel is implemented as a stand-alone pixel or through tag management systems. Creatable has created integrations for Tealium, TagMan (Ensighten), and Google Tag Manager.
The conversion pixel must be configured to send Creatable the following properties:
- Order ID
- SKU
- Quantity
- Price
- GTIN or UPC
Implementation Example
Currently, there are two supported functions. A mandatory config function and a "track" function. The track function requires the products that were purchased as well as the “ORDER_ID” (the unique ID from the ecommerce platform that was assigned to the order).
This implementation can use either a “Staging” URL or “Production” URL. This allows testing to be performed without affecting production data.
Staging Base URL: https://stage.tvpage.com/api/__tvpa.gif
Production Base URL: https://api.tvpage.com/api/__tvpa.gif
Below is an example of the final output that you would see on your “Checkout” or “Thank You” page.
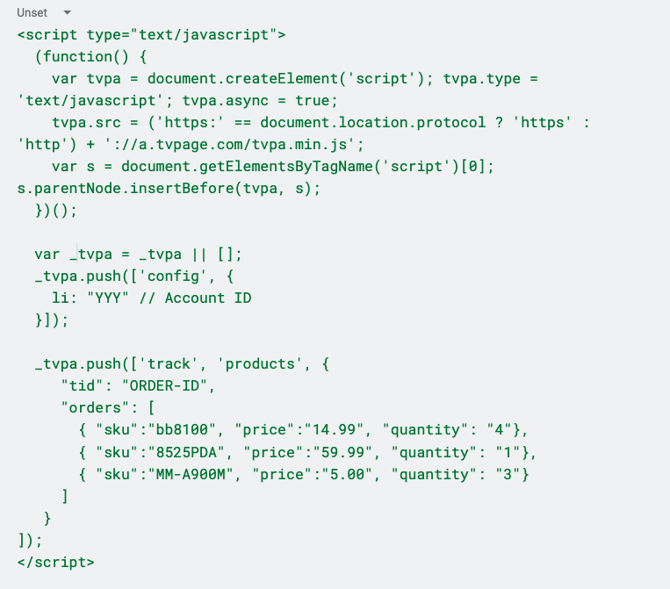
The conversion script is broken down into three separate parts:
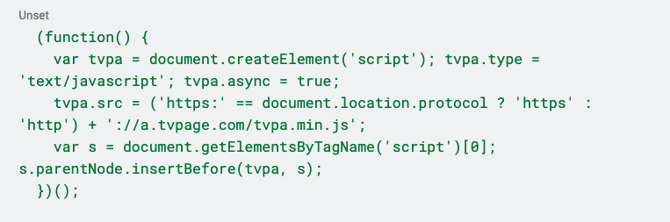
1. This first part is the library that loads asynchronously and communicates with Creatable.
2. The second part configures the analytics tracker to record data for your account & data source. The value “li” will be provided by your Client Success representative.

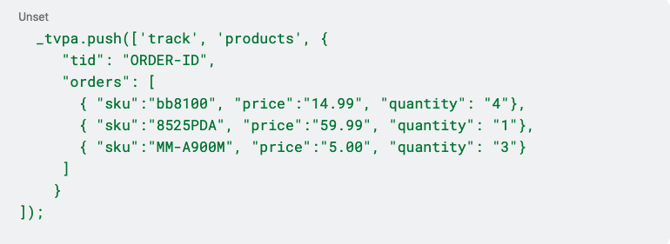
3. The third part tracks the products that were purchased, quantity & price. This JSON data object needs to be created based on the items that were purchased in the shopping cart.
Cookies utilized
Our analytics system utilizes 2 separate cookies for conversion tracking. One cookie is a first-party cookie, the other is a third-party cookie. This to ensure that older sessions can be captured, tracked and attributed correctly as third-party cookies are phased out.
Testing & verifying the conversion pixel
When an order is placed, the Creatable conversion pixel will fire off the product data from the order to our analytics for video conversion and video revenue reporting. When the pixel fires, you can see the relevant data being passed to our system.
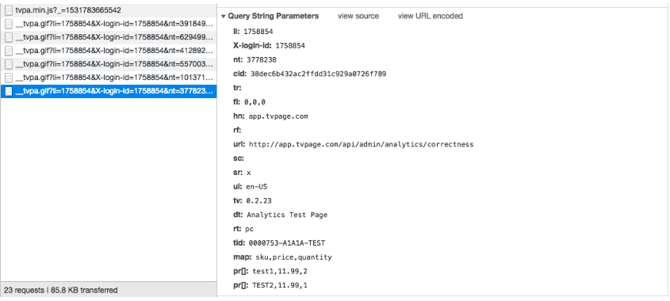
- li: 1234567 (This is the account id that receives the conversion data)
- rt: pc (This is the event code for a product conversion)
- tid: XXX (This is the order id # from the order placed, it can be used for further offline analysis)
- pr[]: AA,BB,CC (This represents 1 row of product data from the order. It is comma separated and contains the SKU, Quantity and Price)
Troubleshooting
When registering conversion, the browser performs a request to the Creatable Analytics Service. A request looks something like this:

The service returns a 1×1 pixel gif along with an http code which verifies if the service is working properly. The codes are interpreted as follows:
Code Message
200 Valid Request
201 Invalid Request Type
202 Valid Request
203 Not data registered
205 Invalid Data. Nothing data was registered
If the service returns error codes other than 200 or 202, please review the data being passed to the tracker to ensure the formatting is correct. If the problem persists, contact us at support@creatable.io.
BigCommerce users
If you are using BigCommerce as your ecommerce platform, the following snippet can be added directly. Simply add your Creatable account number between the quotes after "li":
<script>
(function() {
var ga = document.createElement("script");
ga.type = "text/javascript";
ga.async = true;
ga.src = "//a.tvpage.com/tvpa.min.js";
var s = document.getElementsByTagName('script')[0];
s.parentNode.insertBefore(ga, s);
})();
var _tvpa = _tvpa || [];
var analyticsConfig = {
"li": "",
"logUrl": "//api.tvpage.com/api/__tvpa.gif"
};
_tvpa.push(["config", analyticsConfig]);
fetch("/api/storefront/orders/%%ORDER_ID%%").then(res=>res.json()).then(order=>{
const lineItems = order.lineItems;
console.log("lineItems",lineItems);
const items = [...lineItems.digitalItems, ...lineItems.giftCertificates, ...lineItems.physicalItems].map(product=>{
return {
price: product.salePrice,
sku: product.sku,
quantity: product.quantity
}
});
_tvpa.push(["track", "products", {
"tid": %%ORDER_ID%%,
"orders": items
}]);
});
</script>